Getting Started with MS Graph, Step-by-Step (Part 1) - App Registration
- Frank

- Jul 27, 2022
- 4 min read

Back in the old days of IT, when foundational infrastructure consisted of on-premise components such as servers, desktops, laptops, switches, firewalls, and the associated software, VMware, Active Directory, SQL, Exchange, SharePoint, File and Print, etc., lazy guys like me learned how to access and automate tasks using technologies such as VBScript, WMI, ADO, ADSI, DCOM. When PowerShell arrived much of the underlying technology was obfuscated in cmdlets, modules and the .NET framework. As an Infrastructure admin I still use all of these technologies to this day.
As IT infrastructure began the migration to the cloud, be that Software as a Service (SaaS), Platform as a Service (PaaS), or Infrastructure as a Service (IaaS), some of this legacy technology became less relevant. While the various development teams in Microsoft generally provided PowerShell modules to access the various systems, there wasn’t a standardized overarching way to programmatically access the M365 suite of products. Enter Microsoft Graph.
To quote Microsoft:
Microsoft Graph is the gateway to data and intelligence in Microsoft 365. It provides a unified programmability model that you can use to access the tremendous amount of data in Microsoft 365, Windows, and Enterprise Mobility + Security. Use the wealth of data in Microsoft Graph to build apps for organizations and consumers that interact with millions of users.

I don’t want to turn this post into a history of MS Graph so for those who would like to know more here is a link: Overview of Microsoft Graph - Microsoft Graph | Microsoft Docs
Given how powerful MS Graph is, and that this is Microsoft’s intended standard moving forward, it is important for any self-respecting IT administrator to familiarize themselves with this technology.
In this multi-part series, I’ll provide step-by-step guidance for anyone just starting out to get up and running quickly for accessing M365 programmatically via MS Graph, be that through PowerShell, Azure Logic Apps, etc.
In Part 1, we will cover setting up the API.
Part 1 - Setting up the API
Unlike interactively accessing MS Graph via a web browser, when you programmatically access it there needs to be an API to point your script/app to. To do this, an API needs to be registered.
In Azure AD, navigate to App Registrations blade:

Select New Registration:

Enter a descriptive name, determine who should have access, and press Register.
Who can use this application is determined by what your script, app will eventually do with the API. For example, if you’re creating an internal business process or automation, “Accounts in this organization directory only” is sufficient.
If you’re creating a B2B solution, then Multitenant may be appropriate. Similarly, if you’re creating a B2C solution, you can include personal accounts.
If you’re not familiar with MS Graph yet, and are just starting out for testing purposes, Single tenant is likely the most appropriate starting point.

After the App Registration is created you will be redirected to the Overview page.

Select Authentication from the navigation pane.
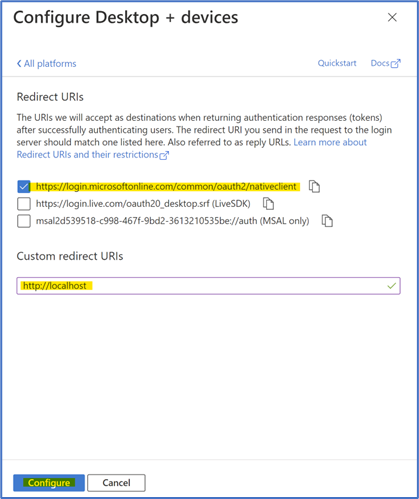
Press “Add a platform”, select the platform your script or app is targeting. For our purposes, we will be creating automation to run in Azure Function App or from a Windows computer, so we’ve selected “Mobile and desktop applications”.
What this configuration does, if you read the description, is to provide the proper redirect URI for the app registration.

The authorization server (Azure AD acting as identity provider) returns access tokens for interactive flows only to registered reply-URLs.
For PowerShell 5.1 we need to add: https://login.microsoftonline.com/common/oauth2/nativeclient
For PowerShell Core we need to add: http://localhost
Press Configure

At this point, you'll see your new Redirect URIs as part of the list.

Technically, you're done!
We'll quickly look around in the other areas within the app registration so you can familiarize yourself.
Select “Certificates and secrets” from the navigation pane.
This section is used to support Application (non-interactive) access to the API. This will be discussed in detail in a future blog post, including how to use Azure Key-Vault to manage your certificate and secrets.
For interactive access, certificate and secrets are not needed since you will be granting the permissions and access at the point of authentication to the app. In essence, the app will impersonate your permissions.

Select "API permissions" from the navigation pane.
By default, a Microsoft Graph “User.Read” permission is present. This allows users to access their own information from Azure AD.
Additional permissions can be added and granted depending on what your app will eventually do. We will revisit this section in a future post. So, be sure to bookmark this for the future.

Congratulations! You now have an entry point to access MS Graph programmatically. Make a note of where to find the Application ID and Tenant ID from the Overview screen. You will need this information so your automation knows how to connect to access your environment.
In part 2 of this Getting Started with MS Graph series, we will demonstrate how to use these attributes to connect into your M365 environment using a simple PowerShell script.
Hope you've found this post helpful. If you did, please share it with your admin friends so they can benefit too! Sharing is caring.
Of course, this is only Part 1. Be sure to subscribe, or follow us on our social channels to be notified when the next part is published.
If you need some additional support on automation, we're very good at this stuff. So contact us to see if we can help support your business goals.
The content on this web site is provided for general information purposes only and does not constitute professional advice. Users of this web site are advised to seek specific technical advice by contacting SiFr or their own IT resource regarding any specific technical issues. SiFr does not warrant or guarantee the quality, accuracy or completeness of any information on this web site. The articles published on this web site are current as of their original date of publication, but should not be relied upon as accurate, timely or fit for any particular purpose.
This web site may contain links to third party web sites. Links are provided for convenience only and SiFr does not endorse the information contained in linked web sites nor guarantee its accuracy, timeliness or fitness for a particular purpose.
SiFr is a Microsoft Partner.


Comments